Recording a Voiceover at Home: Budget Setup for Anyone Who Wants to Become a Voice Over Artist

There are so many people who would love to be voice over artists but do not know how to get started. This blog post is for those people who want to give it a try at home, but don't know where to start. I will go into detail about the equipment you'll need, as well as things that need consideration when recording your voice at home. We will cover acoustic treatment inside of your room, noises that can come in and interfere with recordings, and more!

Check out our closet vocal booth kit!

Microphone + Pop Filter

When it comes to budget voice over setups, there are a few things you will need in order to get started. The first thing you'll need is a microphone. There are many different types of microphones on the market, and each one has its own benefits and drawbacks. If you're just starting out, I would recommend using a USB microphone . They are relatively affordable and easy to use. You can simply plug them into your computer and start recording. 

You may also want to consider a pop filter. This will help eliminate any "popping" sounds from happening while you speak into the microphone. These are essential for your vocal recordings. Pop filters work to eliminate the hisses and plosives in your recordings. The pop filter will attach to your mic stand or desk, and will be positioned so your voice goes through the filter and into the mic. If you ever made a recording and had clipping on "P" sounds then you know what I'm talking about. Pop filters will save you so much time and get you better recordings!

Check out our pop filter video:
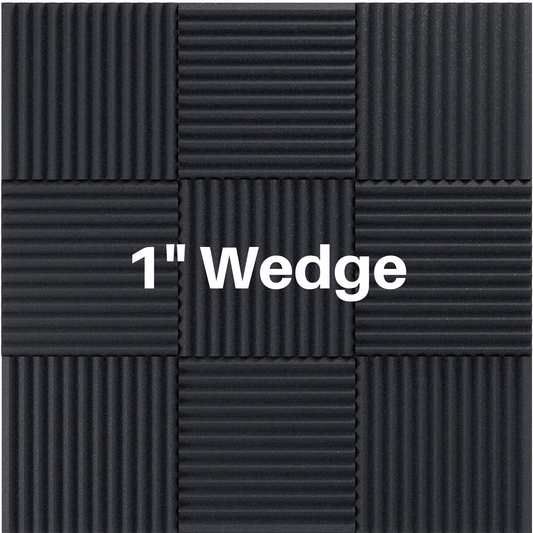
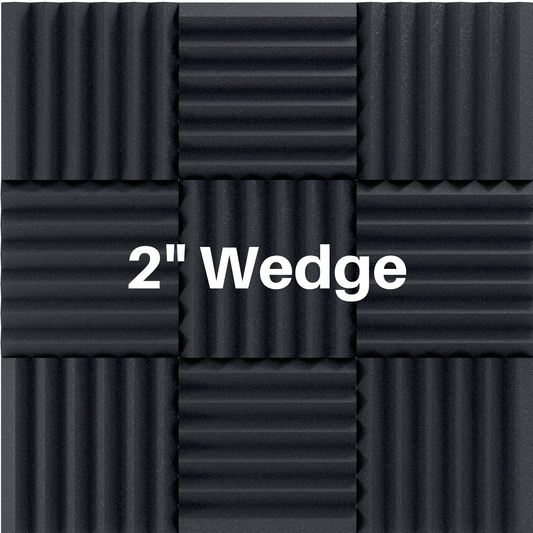
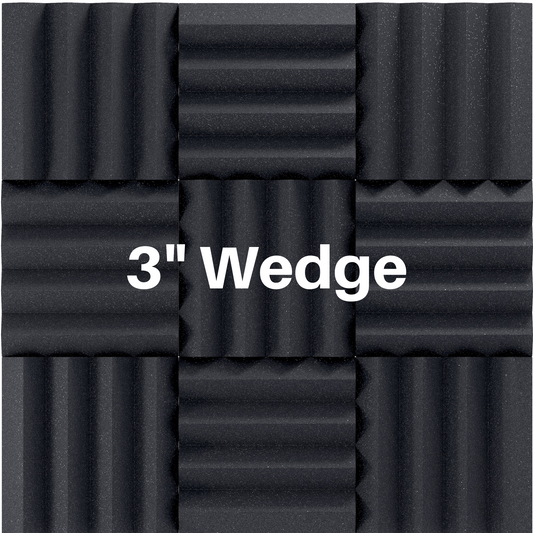
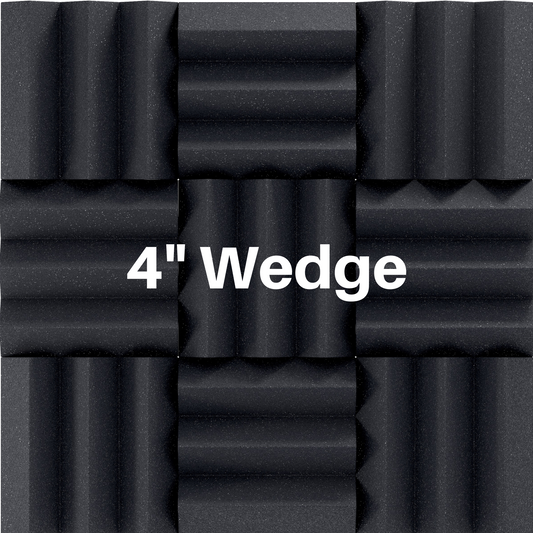
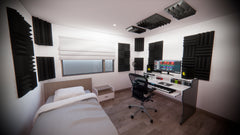
Acoustic Treatment

To record your voiceover at home, you'll need acoustic treatment . Without proper acoustics in your room, it could sound like you're recording inside of an echo chamber! This is because all that noise bouncing around in the walls comes into contact with your microphone, and gets recorded. You'll need to consider things like carpets or rugs on the floor, along with other treatments like acoustic foam panels that you can do within your room!

One option is to do acoustic treatment in the whole room:

voice over setup in bedroom with acoustic treatment  2

One of our recording studio bundles would be great for your home voice over setup!

Another option is to create a vocal recording area in your room. Below is an example of a vocal shield that sits on top of a bookcase. 

vocal shield for stopping echoes when recording with a microphonevocal shield for microphone that is sitting on top of a bookcase
Check out the plans for this vocal shield here!

You will also want to make sure that there are minimum outside noises coming in from windows, doors opening and closing etc., as they could interfere with recordings. 

For sound coming through a wall a good solution to block the noise is to add another layer of drywall with green glue in between. The added mass of more sheetrock combined with the noise blocking properties of green glue will block the sound much better than acoustic foam panels. This is the simplest fix that wouldn't require structural modification to the wall frame. However, that is a pretty large project and you might not even be able to do that if you are renting. 

Doors can be kind of tricky. One problem I see often is the door is not insulated around the edges. Even the slightest crack will let the noise through. The foam might be absorbing some sound waves, but it will go unnoticed if sound is coming through the cracks. Weatherstrips work well for sealing gaps if you do have them. Duck brand makes a good weatherstripping product, and is available on Amazon


For windows, some easy and cheap ideas are weatherstripping or caulk combined with thick curtains. Many times there are small cracks in the windows that are letting the sound through. Weatherstripping or caulk can help tackle that problem fairly easy. Thick curtains will also help dampen sound. Even having a thick comforter over the window will help if you have an extra one around.


Once you have set up your recording space, you will want to make sure that there are no other noises in the room. You can do this by shutting off all fans or air conditioning units. Some lights, especially florescence lights can give off a lot of sound that will be picked up by microphones. If you're using a computer to record with, it would be helpful if you shut down any programs running in the background.

DAW - Recording Software

Another thing you'll need is a DAW, or digital audio workstation. This is the software you will use to record, edit, and mix your voiceover tracks. There are many different DAWs available on the market, but the most popular ones are Pro Tools, LogicProX , and GarageBand (which comes free on macs and iPads).

Other Equipment + Gear

Next is equipment choice! As I mentioned before, USB microphones are an easy way to get started with recording audio at home. They are affordable, and many of them come with their own built-in audio interfaces. This means that you don't have to purchase an additional piece of equipment, which can save you some money.

If you're looking for a higher quality microphone, I would recommend an XLR microphone . These microphones connect to an audio interface , which then connects to your computer. Large diagram condenser XLR microphones are great for recording vocals. Shure makes a good XLR mic. However, they are more expensive than USB microphones.

Lastly, you will need an audio interface. This is the equipment that connects your microphone to your computer. If you choose a USB microphone , this piece of equipment isn't necessary because it's already built into the device! However if you choose an XLR Microphone , then you'll have some research to do when it comes time for purchasing one.

Many people have asked me which audio interface they should buy, so I thought I would give you my two cents! Audio interfaces come in different shapes and sizes. There are ones that sit directly on your desk, while others are rack mounted . They can get pretty pricey, but there are quality affordable options like the Scarlett 2i2. Universal Audio is more expensive but totally worth it.

So now you know what equipment you need to become the next voice over star, but how do you set everything up so you can record your first demos?

How To Set Up Your Voice Over Studio At Home

Step 1 - Plan your recording workflow and recording area. Will you record right next to your desk, or will you create a make shift vocal booth in your closet? Think about what setup will make you the most comfortable and get you the best sound.

Step 2 - Figure out the reflection points of your voice around your microphone and place acoustic treatment at the reflection points.


vocal booth treatment first reflection areas

vocal booth treatment tips for voice over actors

Step 3 - Make sure that you have eliminated any other noises from your recording space. Sometimes it may be impossible to remove all the outside noises like train, traffic, or airplane noise. In these cases you will have to work around these unless you want to put a serious investment into soundproofing.

Step 4 - Connect your microphone to your audio interface, and connect the audio interface to your computer. If you are using an USB mic then just plug it in!

Step 5 - Launch your DAW, and start recording! There are a ton of help articles and videos out there about how to work a DAW. If you have never used a DAW before I recommend picking one and sticking with it for a while because there is a bit of a learning curve with each DAW.

Now that you know how to create a voice over studio at home on a budget, go out there and become the voice over star that you were meant to be!

I hope this blog post was helpful in providing a basic overview of what equipment is needed for creating a home studio, and how all of it works together. If you have any questions at all please contact us! Cheers!

Back to blog

Leave a comment

Please note, comments need to be approved before they are published.

Need Help?

Not sure what you need? Don't worry! One of our acoustic pros will help you get results!

Frequently Asked Questions

Do acoustic panels really work?
Yes, acoustic panels absolutely work when used correctly. Acoustic panels are designed to absorb sound waves, which helps reduce echo, reverb, and unwanted reflections in a room. This creates a cleaner, more controlled sound environment.

Whether you’re treating a home studio, podcast room, home theater, or office space, acoustic panels can make a noticeable difference in speech clarity, mix accuracy, and overall listening quality.
How do I know which panels are right for my room?
Every space is unique. You can contact us for a free room analysis, or check out our guides under the “Learn” section.

Absorption panels help reduce echo and reverb. We offer foam panels and fabric covered panels.

Diffusers scatter sound for a more balanced feel.

Bass traps help control low frequencies that tend to build up in corners.

If you’re trying to block sound from entering or leaving a room, you’ll need soundproofing materials, which are different from acoustic treatments.
Can I order samples?
Yes, we offer acoustic foam samples and well as fabric color swatches. If you are looking for something else please Contact Us.

Order Foam Samples
Order Fabric Swatches
What’s the difference between soundproofing and acoustic treatment?
Soundproofing blocks sound from entering or leaving a room. Acoustic treatment improves sound inside the room by reducing echo and reverb.
Can acoustic panels improve speech clarity?
Yes! Acoustic panels are commonly used in offices, conference rooms, and classrooms to reduce echo and improve speech intelligibility. By absorbing excess sound and reverb, panels make it easier to hear and understand spoken words—even at lower volumes.

Want help improving clarity in your space? Contact us here.
Do acoustic panels block outside noise?
Standard acoustic panels don’t block sound—they absorb it. Acoustic panels reduce echo and reverb inside a room but won’t stop external noise from entering or leaving.

If you’re looking for soundproofing, you’ll need materials designed to block sound transmission like mass loaded vinyl, or decoupled wall systems. We offer select products for this—Contact Us to learn more.

Learn the difference between soundproofing and sound absorption here.
Where should I place acoustic panels?
The best placement depends on your room and goals. For general echo reduction, aim to cover 20–30% of your wall space. For recording studios, home theaters, or listening rooms, focus on:

• Front wall behind speakers
• Back wall behind the listening position
• Side wall reflection points
• Ceiling above your desk or seating area
• Diffusers at key reflection points for natural sound

Need help with placement? Contact us for a free custom recommendation.
Do these panels work for podcasting, streaming, or music production?
Absolutely. We serve customers across all industries — from home offices to professional studios.
What fabric is best for wrapping acoustic panels?
To get the best sound performance, use acoustically transparent fabric—material that lets sound pass through easily. A simple test: try breathing through the fabric. If air flows freely, it’s likely a good choice. Avoid dense materials like heavy denim or canvas, as they can block sound instead of letting it be absorbed.

Looking for a proven solution? Our professional-grade acoustical fabric is highly rated by customers and perfect for DIY acoustic panels.

Shop acoustic fabric here or contact us if you need help picking the right fabric for your project.
Can I order custom-sized acoustic panels?
Yes! In addition to our standard panel sizes, we offer custom-sized acoustic panels for unique spaces, specialty builds, and large-scale projects. Just let us know your dimensions and design goals—we’re happy to create a solution that fits your space perfectly.

Contact us here to tell us about your project and get a custom quote.
Do you offer custom sizes or colors?
Yes, we offer custom sizing and a variety of colors on select products. Just reach out and let us know what you need.

Contact Us for custom quotes.
Are your products easy to install?
Yes! Our fabric-wrapped panels include mounting hardware. For acoustic foam, there are several easy mounting options, including double-sided adhesive squares, spray adhesive, or Command strips for installation without damaging your walls.

Check out our install videos here.
Do I need professional help to install acoustic panels?
Most acoustic panels are easy to install with basic tools and a little DIY experience. We make it simple by providing tutorial videos. Check out our install videos here.

For more complex projects, we’re happy to guide you—or your contractor—through the process to ensure everything is done right.

Contact us here if you need help with installation planning.
How do you maintain acoustic panels?
Acoustic panels are low-maintenance and built to last with proper care. Here are some general tips:

• Dust regularly with a soft, dry cloth
• Use a vacuum with an upholstery attachment
• Clean gently with compressed air
• Spot clean with minimal moisture and dry immediately

Always check your panel’s product specs for specific cleaning recommendations.

Have questions about cleaning or care? Contact us here.
How much do acoustical panels or soundproofing materials cost?
The cost of acoustic panels and soundproofing panels depends on your space and goals. We offer everything from affordable DIY acoustic foam to high-end custom panels for professional studios and luxury interiors. For an accurate quote, let us know your room size, usage, and sound goals—we’re happy to help you find the right solution for your budget.

Fill out our free room analysis for personalized acoustic advice.
How fast is shipping and fulfillment?
Most orders ship in 1-3 business days. Cut to order foam may take a little longer. If you need something in a hurry please Contact Us.
Can acoustic panels be customized for my space?
Yes! We offer custom acoustic panels tailored to your exact dimensions, layout, and design goals. Whether you’re working with an odd-shaped wall, a unique room layout, or a specific aesthetic, we can create panels that fit perfectly.

Choose from a wide range of colors and fabrics to match your space without sacrificing performance.

Contact us here to tell us about your space and get a custom solution.