How To Set Up HiFi Listening Room
A Practical Guide to High-Fidelity Room Acoustics
❓Why Room Acoustics Matter
Great sound doesn’t just come from expensive gear. Even the best speakers will sound poor in a badly treated room. The surfaces in your room play a major role in how the sound reacts. That’s why acoustics is so important when trying to create an optimized listening room.
Just like a musical performance is shaped by the concert hall it’s played in, recorded audio is affected by the acoustics of your listening room. We have all been to a concert where the sound was terrible and makes the performance overall less enjoyable. On the other hand, I'm sure you have been to a concert hall where the sound is AMAZING! If you are ever in the Denver area, check out a show at the Mission Ballroom. The sound is great!
📏Start with Room Size
Ideally, you will have a dedicated room. Larger rooms are preferred. Your room’s size and shape determine how sound behaves.
Rooms with poor dimensions can cause sound waves to bounce around unevenly, creating buildups (peaks) or dead spots (nulls), especially in the bass range.
The Golden Ratio is a mathematical proportion found in nature, art, and architecture. In acoustics, applying this ratio to room dimensions helps in distributing resonant frequencies more evenly, minimizing acoustic anomalies such as standing waves and flutter echoes.
Golden Ratio = 1.618:1
🔑Applying the Golden Ratio
To design a room using the Golden Ratio:
- Start with the ceiling height as the base dimension.
- Calculate the width: Multiply the height by 1.618.
- Calculate the length: Multiply the width by 1.618.
Example: If the ceiling height is 8 feet:
- Width = 8 ft × 1.618 ≈ 12.94 ft
- Length = 12.94 ft × 1.618 ≈ 20.94 ft
The room dimensions would be approximately 8 ft (height) × 12.94 ft (width) × 20.94 ft (length).
Other Useful Ratios For Acoustically Optimized Room Dimensions
While the Golden Ratio provides an ideal starting point, real-world constraints often require flexibility. Here are some alternative ratios that have been found effective in acoustic design:
- 1:1.14:1.39
- 1:1.28:1.54
- 1:1.6:2.33
These ratios aim to avoid equal or multiple dimensions, which can cause overlapping resonances.

🔊 Understanding Modal Resonances
Every room has modal resonances which are sound waves, mainly low-frequency, that reflect between two parallel walls or the floor and ceiling. These "modal frequencies" depend on the room dimensions. If untreated, they create uneven bass and unpredictable sound.
Room modes are patterns of sound that build up in a room when low frequencies bounce back and forth between walls, floor, and ceiling. They happen when sound waves “fit” the space in a way that causes them to reinforce or cancel each other out.
A good way to picture it is to think about a guitar string. When you pluck the string, it vibrates a certain shape depending on the note. Some parts of the string move a lot (those are called antinodes), and some parts don’t move at all (called nodes).
Sound waves in a room work the same way. At certain frequencies, the air in the room vibrates in standing wave patterns, just like the string. Some spots in the room will have extra-strong bass (peaks), and others will seem to have almost no bass (nulls).
These patterns are called room modes, and they cause bass to sound too loud in one corner of your room and too quiet in another.

Mode 1 (Fundamental):
The sound wave fits between two walls with one big rise and fall — this causes strong bass buildup at the room boundaries.
Types of Room Modes (Based on Reflection Paths)
Axial Modes
- Involve two parallel surfaces (e.g., front and back walls).
- These are the strongest and most important to deal with because they carry the most energy.
- Think of bass bouncing directly from the front to the back of your room and piling up.
Tangential Modes
- Involve four surfaces (e.g., all four walls).
- These are weaker than axial modes but still contribute to uneven sound, especially in the mids.
- They show up when sound ricochets diagonally across your room.
Oblique Modes
- Bounce off all six surfaces (walls, floor, and ceiling).
- These are the weakest and usually not a major problem unless you’re building a pro studio.

If you’re designing a Hi-Fi listening room or treating a space at home, axial modes are your top priority. They have the most impact on what you hear—especially in the bass range—and are easiest to predict and fix.
If you are still confused about room modes, don't worry, all you really need to know if that your room naturally has problems which can be solved with acoustic treatment.
🎚️ Fixing Low-Frequency Issues with Bass Traps
Controlling low frequency sound waves in a room is accomplished using bass traps. These reduce resonance by absorbing energy at key modal frequencies.

Standard acoustic panels do little below ~200 Hz. Use thick bass traps or custom built solutions for effective bass control. CLICK HERE for free bass trap building plans.

Bass traps are normally spaced in the corners of a room to increase effectiveness. Below is an image showing our acoustic foam bass traps installed in the corners of a home studio.

📉 Reverberation Time (RT60)
RT60 is the time it takes sound to decay by 60 dB in a room.
• Too long = echo and muddiness
• Too short = dry and unnatural
For HiFi listening rooms rooms, the target RT60 is around 0.5 seconds. This keeps music clear and natural, especially across different genres.
Use our RT60 calculator to calculate the estimated RT60 of your room.
Overuse of acoustic absorption, soft furniture or carpets may absorb too much high frequency energy and make the room feel "dull" or "dead". You can run into this issue more in smaller rooms. Acoustic diffusion can help with this to make small rooms sound larger and more lively.
Below is an image showing the difference in reverberation time in a treated room vs an untreated room.

🎯 Reflection Points & Mid-to-High Frequencies
So now you have a plan for treating bass, and you know how many square foot of treatment your room needs. The next thing to figure out is where to put the treatment. For this we will start with focus on early reflection points. These are spots where sound bounces from the speaker to the wall and then to your ear.
Here’s a list of all the primary reflection points to consider when treating a HiFi listening room for improved sound clarity and imaging:
- Side walls (left and right)
- First reflection points from each speaker to your ears.
- Front wall (behind speakers)
- Especially important for dipole or rear-ported speakers.
- Rear wall (behind the listening position)
- Critical for reflections that bounce back toward the front of the room.
- Ceiling above listening position
- Vertical reflections can muddy the stereo image and mid/high frequencies.
To find side reflection points use the mirror trick:
1. Sit in your listening chair
2. Have someone move a mirror along the wall
3. Wherever you see the speaker = reflection point
→ Place acoustic panels there
🔈 Speaker Placement & Listener Positioning
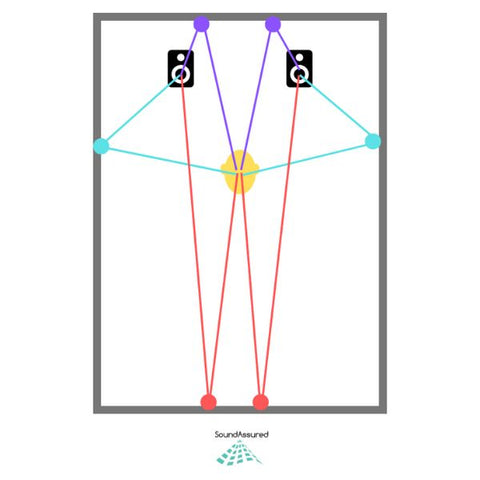
2-Channel Speaker Placement
There are a couple different ways to set up your speakers for a 2-channel room.
Listening Position With Longer Distance From Speakers

- Speaker Distance from Back Wall (Depth):
- The speakers should be placed 0.8 × A into the room (depth-wise).
- Listening Position Distance from Back Wall (Depth):
- The ideal listening position is 1.25 × A away from the back wall.
Speaker spacing (W) = 0.8 × X
Listening distance (L) = 1.25 × X
Speaker toe-in angle ≈ 72.5°
Listener angle ≈ 35°
Example:
Width ≈ 12.94 ft
Length ≈ 20.94 ft
Speaker Spacing (Distance Between Speakers):
- 0.8 x 12.94 = 10.352 ft
- Spaced 10.35 ft apart, centered on the front wall
- Angled inward at approx. 72.5° toe-in
Listening Position Distance from Front Wall:
- 1.25 x 12.94 = 16.175 ft
- Placed 16.18 ft from the front wall (toward rear wall)
- Listener angle: ~35° between speaker axes
Listening Position With Shorter Distance From Speakers (Equilateral Triangle)

Start by facing the shortest wall in your room. Align your listening position along the room’s length.
The exact distance from the wall will vary based on your room’s size, but a good rule of thumb is the 38% rule, proposed by studio designer Wes Lachot. This suggests that the optimal listening position in a rectangular room is approximately 38% of the way from the shortest wall. Avoid placing your seat directly in the center of the room.
Wes also recommends keeping at least 2 feet of space between your speakers and the back wall for better sound clarity. While this is ideal, we understand it may not always be possible in smaller rooms.
You will want the speakers in a triangle shape with your head and have each speaker the same distance from you and from each other. But instead of pointing the speakers right at your ears, try aiming them just a little behind your head. This can give a better sound.
Make sure the tweeters (the small speaker part) are at ear level or tilted toward your ears. Don’t block the space between you and the speakers.
Place the speakers about 60 to 87 inches apart if you have the space. To find the best position, play a song with clear vocals and slowly move the speakers closer together until the sound feels balanced. Then, gently angle them inward (toe-in) to focus the sound in the center, but don’t overdo it, as too much toe-in can make the audio sound muddy.
Example:
Width ≈ 12.94 ft
Length ≈ 20.94 ft
- 38% of 20.94 ft ≈ 7.96 ft (Place your ears about 8 feet from the front wall).
- Speaker-to-speaker distance: Start with about 6 to 7 feet apart (within the 60–87 inch range for ideal imaging).
- Speaker-to-wall distance (rear): Leave at least 2 feet behind the speakers.
- Speaker-to-listener distance: Form an equilateral triangle with the listening position, so each speaker should be about 6 to 7 feet from your ears.
- Toe-in: Slightly angle the speakers inward so they aim just behind your listening position for a focused soundstage.
Remember that these are rules of thumb, and often experimentation is best to get the sound dialed in.
Surround Sound Speaker Placement
This diagram illustrates the standard 5.1 surround sound speaker layout based on industry standards. Make sure to consult your speaker manufacturer for specific recommendations if needed.
For best results, the center speaker should be directly in front of the listener, with the front left and right speakers angled at 30°. Rear surround speakers should be positioned between 110° and 120° to create a fully immersive soundstage.

📝 A Simple Room Treatment Plan
Here’s a starting point for most small to mid-sized listening rooms:
|
Treatment |
Placement |
|---|---|
|
Bass Traps |
Corners & ceiling-wall edges |
|
Absorptive Panels |
First reflection points |
|
Ceiling Clouds |
Above listening position and moving towards back wall |
|
Diffusion or Panels |
Rear wall behind listener |
|
Rug or Carpet |
On the floor between speaker and listener |

How high to hang acoustic wall panels?
A good rule of thumb is to place acoustic panels at ear level when you’re sitting or standing in the room. Why? Because sound travels in straight lines. You want the panels to catch sound waves where they bounce the most—right where your ears are.
- For seated setups this usually means mounting panels so the center of each one is about 3.5 to 4.5 feet off the ground.

🔇 What About Noise from Outside the Room?
In some cases, outside noise (HVAC systems, other rooms, traffic) can leak in and ruin the experience. For best results, use:
• Solid-core doors with proper seals
• Isolation from noisy appliances
• Quiet HVAC design (low-velocity ducts)
These can add cost but dramatically reduce unwanted interference.
Learn more about soundproofing HERE.
Check out our soundproofing panels HERE!
Need more help? Don't worry! We are here for you!