
How To Design A Home Recording Studio
Here we are going to go over the equipment needed for a home studio, where to get the best deals on gear, how to think about and design your setup, sound treatments, and how to get everything set up and going.

What Equipment Do I Need For A Home Recording Studio?
There are some things that you must have in a home studio. Below is a list of the essentials!
Recorder
You need something to capture the sound. Back in the day tape was popular, but nowadays it is much easier and more efficient to go digital. The most common recorder nowadays is a computer but there is another option available called stand alone recorders, like the Tascam DP-03SD Digital Portastudio Multitrack Recorder.
Audio Interface
If you are using a computer then you will need an audio interface, which is a device that you can plug microphones, instruments and midi devices into and then the device transfers that information into your computer. The one I have in my home studio is a Focusrite Scarlett 2i2 and plugs in with a USB cord.
DAW (ie: Garageband, Pro Tools, Ableton etc.)
What digital audio workstation (DAW) you choose is an important decision when setting up your home studio. If you have an Apple computer then Garageband comes stock so this is going to be the cheapest option. Protools is the industry standard but there are so many good options like Ableton, Cakewalk, Reason, FL Studio.
If you already have experience with a DAW I would just stick with it since the learning curve can be so high with these programs. If you have no experience you can always do a free trial of a couple programs and then decide which one you like. You might also find it helpful to watch some YouTube tutorials on the DAW while going through the free trial to give you some more ideas of how to use different functions within the program.
Microphone
A good mic is essential for capturing clear audio tracks! You can either go with a large diaphragm condenser (LDC) or a dynamic mic.
A large diaphragm condenser mic is commonly used for vocals in professional studios because they have a good frequency response, can pick up the low ends and are very sensitive in their ability to pick up sounds. A condenser microphone will require phantom power. These mics can get expensive! Some lower cost options are the MXL 990 and the Aston Origin. If you have deep pockets the Neumann U 87 is a solid choice!
Dynamic mics are a bit more rugged than condensers but do not have as good of a frequency response. A common vocal dynamic microphone is the Shure SM7B.
Headphones or Monitors
Headphones and monitors are used to listen back and mix your tracks. You don’t need both so beginners often start out with just a pair of monitoring headphones. You want to choose a pair with a flat frequency response and avoid headphones with bass boost or enhanced audio. A good pair of headphones are the Audio-Technica ATH-M50x. If you have monitors it is important to consider your room as you might need treatment which is discussed later.
Other gear is not as essential as the things mentioned above, but is a definite plus for a home studio! Let's go over some a few more pieces of equipment that could come in handy in your home studio.
Beat Machine (ie: Akai MPC)
A MPC is a stand alone beat machine used in a lot of hip hop and rap production. An example is an Akai MPC Studio. You can use your audio interface to plug these machines directly into your computer and record the beats you make on the MPC into your DAW as an audio file. Some DAW’s will even sync up with your MPC or beat machine so that you can control the DAW with an external device.
Keyboard With Midi Controls
Midi keyboards can also be used to connect to your DAW. Often you can use a USB cord to plug the keyboard directly into your computer without the need to route it through the audio interface. These keyboards can be used to control and play electronic instruments like horns or electronic pianos that are programmed into your DAW.
A simple keyboard to start with is the Akai Professional MPK Mini MKII which includes midi pads and built in sounds! A good full size midi keyboard is the M-Audio Hammer 88.
Plugins
You can also purchase what are called plugins. A plugin can be a set of instruments that you can use your midi keyboard to play. They can also be an audio processor plugin like a compressor or equalizer. You can also find auto tune plug ins out there to add voice effects to your tracks. If you can think of it there is probably a plug in for it.
Acoustic treatment
If you are recording vocals or live instruments then you will need to consider acoustic treatment in your home studio. If you are plugging all instruments into your computer/recording direct, and you are only listening back through headphones then you will not need to worry about acoustic treatment. We will dive in deeper on acoustic treatments later in this post.
Where To Buy Home Recording Studio Equipment
Your local music shop is always the best place to start! Pawn shops also tend to have some pretty good deals on equipment and you can always try to barter with them. Another good place to find studio equipment is your local Craigslist and Facebook market place.
There are numerous online retailers where you can purchase home recording studio equipment. Sweetwater and Guitar Center are super popular. Amazon is also a great place to get deals on gear!
What Acoustic Treatments Are Needed For Home Recording Studios
Acoustic treatments need to be considered if you are doing any recording in the room, or if you are mixing with speakers (monitors).
Generally recording studios will have 25-35% coverage to get the desired echo reduction and lowering of reverb in the room.
Acoustic absorbers, bass traps and diffusers are commonly used to treat home recording studios.
With acoustic treatment you are trying to prevent reflections which are the cause noticeable echoes. Reflections are caused when sound bounces off flat, hard surfaces. Below is an image showing how sound reacts to various surfaces.

What are acoustic absorbers, and do I need them?
Sound absorbers turn sound energy into other forms of energy so that the sound is NOT REFLECTED back into the room.
Types of sound absorbers:
- Porous absorbers (most popular)
- Ex: acoustic foam & fabric covered panels
- Diaphragmatic absorbers
- Resonant absorber (Helmholtz)
We will focus on porous absorbers because they are most applicable in a home recording studio. Porous absorption can come in many forms. Anything soft and/or fluffy in nature will help absorb sound and dampen noise to some effect. Common acoustic absorbers are acoustic foam, fabric covered panels and polyester panels aka PET felt panels.
Acoustic absorption can solve various acoustic problems you may be having.
- Too much echo
- Too much reverberation
- Standing waves
These are common problems in a recording studio that acoustic absorption can help solve.
- Do your recordings sound echoey and jumbled?
- Is it hard to mix using your monitors because of too much reverb in your room?
- Does your room sound boxy?
- Does your room have a comb filtering effect?
If you answered "yes" to any of these questions then acoustic absorption will likely help you out!
What are bass traps? Will I need them in my studio?

Bass traps are used to absorb the low end frequencies that thinner acoustic panels cannot effectively absorb. Most home studios will benefit from using bass traps as explained below.
Bass traps accomplish goals such as obtaining a flatter low frequency room response, taming standing waves in a room and deadening boomy sounding rooms.
A flat low frequency response means that the bass tones coming out of your speaker or amp are exactly what you are hearing with no variation. You want a flat frequency response when mixing or practicing in order to have some control when adjusting the mix or the settings of your amps. You do not want the room to completely change the sound coming from the source(s). You can obtain a flat low frequency response by using bass traps to absorb low frequency sound waves and prevent standing waves.
Standing waves are created when the bass frequencies are reverberating around your room and bounce into each other. You can find out if you have standing waves by putting your favorite song on and listening. Lean forward and back then walk around the room to see if the bass sounds louder or softer in different areas of the room. If you notice differences then you probably have standing waves.
Standing waves can do two things:
- Over emphasize the bass from all your speakers giving the room a bass boost.
- Cancel out some or all of the bass tones coming out of the speakers/amps.
Just like some headphones have a "bass booster" some rooms because of their dimensions and other characteristics also have a natural bass booster. Alternately, some rooms will have the adverse effect making the bass sound sound softer than intended.
In a home studio either of these problems will seriously mess up your recordings and mixes!
Our acoustic foam bass traps like all our acoustic foams absorb sound waves by changing sound energy into heat through friction. Thinner foams are great for taming mid and high frequencies. However, rooms treated with all thin foam will have a flatter response and more of a dead sound but will also sound boomy at the same time. To avoid a boomy sounding room you will need to use bass traps.
Bass traps are usually installed in the corners of rooms and at wall intersections. In a mixing room, mount them in the corners of the room up against the ceiling behind where you sit. Every room is different so the bass traps may need to be adjusted a bit before you notice the desired result.
What are acoustic diffusers? Will I need diffusion in my studio?
Acoustic diffusers are used to treat echoes and reflections. Unlike acoustic foam panels that are designed to absorb sound waves at different frequencies, acoustic diffusers are designed to scatter sound waves.
Acoustic absorbers and diffusers both treat echoes and standing waves, but absorption panels will have a dampening effect while diffusion panels will maintain a more lively sound.

Many home studio owners use diffusers to make a small room sound bigger, or to keep some liveliness in the room. Some producers prefer more liveliness in their recordings rather than using all absorption and adding reverb during post production using professional plugins. Send us a message if you are not sure if diffusers are right for you!
How To Soundproof A Home Recording Studio
Soundproofing a home recording studio can be accomplished by:
- Treating the weak spots in your room (often the doors and windows).
- Adding mass to the walls, ceiling, and/or floor.
- Addressing the noise floor and trying to lower it.
- Using a room within a room technique (if necessary).
Soundproofing requires a different approach in acoustic treatment compared to treating echoes and reverberation. Some people think you can slap a bunch of acoustic foam on the wall and make it soundproof. This is false. Soft and fluffy things like acoustic foam are used for sound absorption, while dense materials are used for soundproofing.
True soundproofing is not a quick and easy process. If you do not have much external noise to worry about in your home studio then I would advise to focus your budget on other things that will have more of an impact in your studio.
However, if you live near a busy road, have a noisy neighbor, or have other external factors that cause noise to come into your room then soundproofing is something that you will need to address.
Soundproofing is all about increasing the transmission loss of sound. Transmission loss of sound is a measurement of the reduction in sound level of a sound source as it passes through an acoustic barrier. It is the number of decibels that are stopped by the acoustical barrier or the wall and is measured at different frequencies.
Heavier walls and acoustic barriers have a higher transmission loss than lighter materials. For example, a wall constructed of twelve inch thick dense concrete will have a much higher transmission loss than a four inch thick hollow brick wall.

Treating the weak spots in your room.
When soundproofing a room the weak spots are often the doors and windows.
Doors can be kind of tricky. One problem I see often is the door is not insulated around the edges. Even the slightest crack will let the noise through. Your soundproofing might be blocking most sound waves, but it will go unnoticed if sound is coming through the cracks. Weatherstrips work well for sealing gaps if you do have them. Duck brand makes a good weatherstripping product, and is available on Amazon. Door draft jams can also be helpful for sealing gaps. Another idea for doors is to hang a sound blanket over the door to cover the cracks while you are recordings.
For windows some easy and cheap ideas are weatherstripping or caulk combined with thick curtains. Many times there are small cracks in the windows that are letting the sound through. Weatherstripping or caulk can help tackle that problem fairly easy. Thick curtains will also help dampen sound. Even having a thick comforter over the window will help if you have an extra one around.
Adding mass to the walls, ceiling, and/or floor.
Some common materials used for beefing up mass are more drywall, mass loaded vinyl, insulation and noise blocking caulks.
If you live in an apartment or a condo and have a noisy neighbor with sound coming through a shared wall then you can focus on this single wall. For sound coming through a wall a good solution to block the noise is to add another layer of drywall with green glue in between. The added mass of more sheetrock combined with the noise blocking properties of green glue will help block out your noisy neighbor.
For walls you can also use mass loaded vinyl combined with more drywall. The mass loaded vinyl will be installed over the current layer of drywall, then a new layer of drywall will be installed over the mass loaded vinyl. This will work similarly to the green glue/drywall.
For ceilings you will take a similar approach to the walls and use either green glue or mass loaded vinyl combined with extra drywall. If you have upstairs neighbors and can hear their footsteps as loud "thuds" this is considered impact noise and is best treated at the source, meaning the floor above would need treated with flooring underlayment to help prevent the impact noise. If you do not own the upstairs, or your neighbors are unwilling to help then use mass loaded vinyl combined with drywall and try to work your recording schedule around your upstairs neighbors' schedule.
If you have a loud neighbor downstairs and can hear noise coming through the floor then you will need to consider soundproofing your floor. This involves putting underlayment down underneath your flooring. You can also check with your local carpet or flooring business and ask for something with a high Impact Insulation Class (IIC) Rating.
Addressing the noise floor and trying to lower it.

Noise floor, also known as background noise, is the unwanted sound that you don’t want to be a part of the audio recording! Sometimes the noise floor comes from the hisses, hums, or droning noises that sound systems produce. Other times it’s your roommate’s ringing cellphone, the creaking floor of your apartment, the HVAC system, lighting or the chirping birds by the window.
These noises are sometimes too quiet to hear, but the recording device can pick them up and often amplify the sound! When you’re mixing or mastering a track, the audio tends to be turned all the way up, and unfortunately, the background noise will be turned up too. You are going to want to avoid ruining your track!
How to Reduce Noise Floor in Your Recordings:
1) Look for the Quietest Room in Your Home
The easiest way to avoid unwanted background noises is to never record in a noisy place, to begin with! Check every room and see which one is the quietest. Many times the quietest room will not have any shared walls with neighbors or windows.
Once you've chosen a spot for your recording, familiarize yourself with the common ambient sounds produced in that room and find ways to reduce noise.
Record the room tone before going all the way in. This is a type of test recording using your microphone. Just turn your microphone on and hit the record button; no need to speak. After recording for 10 to 20 seconds, playback to check the natural noise of the room. As you listen, figure out ways to eliminate the unwanted noise.
2) Unplug Noisy Appliances
When checking the natural noises in a room during test recordings, you’ll notice that the sound from room appliances is often the culprit behind unwanted background noises. Before sitting down for a recording, unplug all the room appliances that are causing unwanted noises in the background.
For example, your computer’s CPU might be making those swooshing sounds, or your AC might generate droning noises. If it’s the electric fan or the AC, you can sweat it out for a minute or two and turn these appliances on only after you’re done with your recordings. Trust us; the effort will be worth it.
Soundproofing techniques will also help lower the noise floor in your home recording studio!
Using a room within a room technique.
If your home is prone to extreme amounts of external noise then you may need to take drastic measures to block outside noise from your home recording studio. Creating a room within a room is one of the best ways to block outside noise. This is also known as a floating room.
Building a floating room is about as far as you can go to get a true soundproof experience. This would require decoupling the floor, walls and ceilings and even installing a second door. The inner wall is treated with soundproof insulation and there is an airspace in between the inner wall and outer wall. The floating floor is separated from the original floor with vibration sound absorbers and is treated with insulation as well. Magnetic door seals provide a great seal to prohibit sound transmission.
These rooms can be expensive but if you plan to make an income at your home recording studio you may need to explore this option. It would be a shame to have a client at your house recording only to have to redo it because a garbage truck drove by. Also, you will not have to worry about your neighbors complaining about all the noise!
Home Recording Studio Setup Ideas
Below are some examples of home recording studio setups. Remember that diffusers can be used instead of absorption if you want to keep more liveliness in the room or make a small room sound a bit bigger.
Home Recording Studio Example A Breakdown:
1. Bass traps in upper corners to dampen low end frequencies and prevent standing waves.
2. Acoustic foam panels on side wall to absorb first reflections and lower reverberation time.
3. Acoustic foam panels on ceiling to absorb first reflections and stop echoes.
4. Acoustic foam panels on wall behind monitors to absorb first reflections.
5. Acoustic foam panels on back wall to absorb first reflections from monitors.
6. Monitor isolation pads to absorb vibration that would transfer to your desk and floor.
Example A is a standard home mixing studio setup or an at home beat making room.


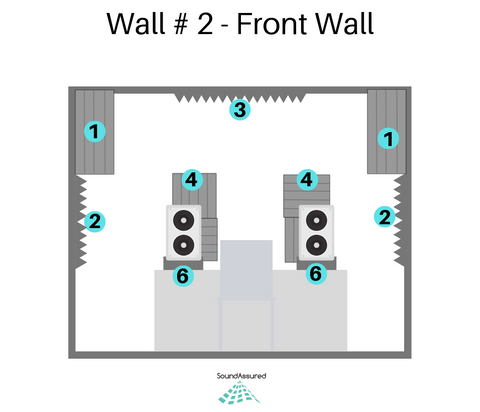
Home Recording Studio Example B Breakdown:
1. Bass traps in upper corners to dampen low end frequencies and prevent standing waves.
2. Acoustic foam panels on side wall to absorb first reflections and lower reverberation time.
3. Acoustic foam panels on ceiling to absorb first reflections and stop echoes.
4. Acoustic foam panels on wall behind monitors to absorb first reflections.
5. Acoustic foam panels on back wall to absorb first reflections from monitors. Heavy coverage in back of room for live instrument recordings.
6. Monitor isolation pads to absorb vibration that would transfer to your desk and floor.
Example B is a multipurpose room that you could use for at home mixing and mastering while having an area to record live musicians when needed. Vocals could also be recorded in the back of the room if you wanted to record voice over at home, singing or rapping.


What Is The Best Home Recording Studio Package
The best home recording studio package depends on your needs. If you are starting from scratch there are some reasonably priced studio bundles on Amazon that will get you going!

For example, the above studio bundle comes with Focusrite Scarlett 4i4 USB Audio Interface (3rd Generation) + PreSonus Eris Nearfield Monitors, Tascam TM-80 Studio Microphone, SR860 Headphones, and More! This is everything you need to get started besides the computer.

A cheaper option is the Tascam home recording studio bundle which includes TASCAM’s US-2x2 USB audio interface, TM-80 studio condenser microphone, TH-02 headphones, and Cakewalk SONAR X3 LE and Ableton Live Lite 9.
If you have too much echo and reverb in your room then you need to look into a home recording acoustics bundle. We offer two sizes of room bundles. You can check them out here.
If you want a personalized home recording studio bundle please fill out our free room analysis. Follow the link then click "Small Room or Personal Analysis" and fill out the requested information. We will get back to you with personalized recommendations and a customer treatment plan for your home studio.
How To Connect Home Recording Studio Equipment
Connecting home studio equipment will vary on which gear you have in your setup. Below is a generic flow chart of how things will generally be set up.

I hope this info was helpful. If you have any questions at all please contact us! We are glad to help!
-------
Read More:
What Is Noise Reduction Coefficient (NRC) ?
1 comment
Hw much money well take me to open my studio at home