
At home recording studio equipment is getting cheaper and cheaper making it an amazing time to be a musician or producer. Getting in the music game has never been so easy!
But don't forget in home recording studios still need acoustic treatment! You would rather spend a little money upfront on some acoustic panels than spend time recording in a room with too much noise or reverb. Don't waste your time recording if the room doesn't sound okay at best!
How to set up your home recording studio is a tricky question to answer. The answer varies depending on the room. However, there are a few principles that can help guide you in the right direction.
How To Treat Common Problems
For a home based music studio the main acoustic problems are:
- Too much reverb
- Room modes / standing waves
- First reflections or echoes
Too much reverberation?
Treat by adding absorptive panels like acoustic foam to dampen the echoes and bring down the reverberation time in your room. Bringing the reverberation time down to below 0.5 seconds is important for crisp recordings.
Room modes or standing waves?
Treat by adding bass traps to the upper corners of the room in combination with acoustic panels on the walls.
The frequency of room modes depends on the size of your room but they occur when the sound waves bounce back and forth between surfaces in the room at a resonant frequency. Standing waves can be detrimental when mixing because they change the frequency response of the room!
First reflections or noticeable echoes?
Treat by adding absorption panels to the reflections points of your speakers or other sound source(s). Below is a diagram showing the reflection points for an average home recording studio setup.

Home Recording Studio Ideas
Home Recording Studio Example A Breakdown:
1. Bass traps in upper corners to dampen low end frequencies and prevent standing waves.
2. Acoustic foam panels on side wall to absorb first reflections and lower reverberation time.
3. Acoustic foam panels on ceiling to absorb first reflections and stop echoes.
4. Acoustic foam panels on wall behind monitors to absorb first reflections.
5. Acoustic foam panels on back wall to absorb first reflections from monitors.
6. Monitor isolation pads to absorb vibration that would transfer to your desk and floor.
Example A is a standard home mixing studio setup or an at home beat making room.


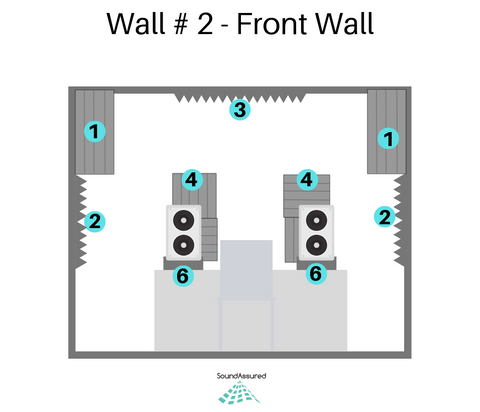
Home Recording Studio Example B Breakdown:
1. Bass traps in upper corners to dampen low end frequencies and prevent standing waves.
2. Acoustic foam panels on side wall to absorb first reflections and lower reverberation time.
3. Acoustic foam panels on ceiling to absorb first reflections and stop echoes.
4. Acoustic foam panels on wall behind monitors to absorb first reflections.
5. Acoustic foam panels on back wall to absorb first reflections from monitors. Heavy coverage in back of room for live instrument recordings.
6. Monitor isolation pads to absorb vibration that would transfer to your desk and floor.
Example B is a multipurpose room that you could use for at home mixing and mastering while having an area to record live musicians when needed. Vocals could also be recorded in the back of the room if you wanted to record voice over at home, singing or rapping.


Home Recording Studio Example C Breakdown:
1. Bass traps in upper corners to dampen low end frequencies and prevent standing waves.
2. Acoustic foam panels on side wall to absorb first reflections and lower reverberation time.
3. Acoustic foam panels on ceiling to absorb first reflections and stop echoes.
4. Medium coverage of acoustic panels on front area of room for live instruments.
5. Heavy coverage of acoustic panels in back of room for live acoustic drum set.
Example C is a live room for jamming with a band at home. We split the room into two. The side with drums has more acoustic panels in order to dampen the reverb and loudness. Small rooms can make drums sound horrible but acoustic absorption and bass traps help tremendously. The room may sound a bit dull but after recording you can always add reverb on your DAW. It is much harder to take away bad reverb or echoes in recorded audio.


Other Tips & Tricks
- Set up your room with monitors face down the long end of your room. If you are sitting in the listening position the longest walls should be to your side.
- Use the mirror trick to find reflection points. You will need a friend for this one. Have them sit at the listening position then take a small mirror and move it along the sidewall. The person sitting in the listening position should be looking for the speakers in the mirror. If they can see the speakers in the mirror mark that spot on the wall and that is where you need to place the acoustic foam panels.
- Place a rug on the floor if no carpet or big soft furniture to reduce reverberation time in the room. You will notice couches in the illustrations. These are not only for sitting but also perform an acoustic function by absorbing some sound waves.
- If you live in an apartment use 3M command strips for posters to mount the foam to the wall temporarily. You can also follow the below diagram to hang acoustic foam for temporary use. You can get the 24x36 inch coroplast sheets on Amazon here.

We offer SPECIAL DISCOUNTS on bundles of acoustic panels and bass traps. Check out our HOME RECORDING STUDIO BUNDLES!
If you still have questions we are glad to help you! Please contact us anytime or fill out our free acoustic room analysis!
Read More:
What Is Transmission Loss Of Sound ?
What Is Noise Reduction Coefficient (NRC) ?
Soundproofing Foam For Music Studios